大量のMicrosoft 365 ユーザーをGUIで作成するのは時間がかかる上にミスが出るので非効率です。
この記事では、PowerShellを用いてCSVファイルのデータを読み取りユーザー作成を一括で行います。
環境
- Microsoft 365 のテナント
- Microsoft Graph PowerShell SDK
- PowerShell version : 7.3.4
作成
ユーザー作成用のCSV作成
以下の表に合わせてCSVのファイルを作成してください。
| UserPrincipalName | DisplayName | Password |
| [email protected] | aaaa | Password1234a |
| [email protected] | bbbb | Password1234b |
| [email protected] | cccc | Password1234c |
姓名や電話番号を入れたい場合は以下のように列を追加して作成します。
| Surname | GivenName | JobTitle | Department | BusinessPhones | MobilePhone |
| aaaa | example | 部長 | Sales | xxx-xxxx-xxxx | xxx-xxxx-xxxx |
| bbbb | example | Sales | xxx-xxxx-xxxx | xxx-xxxx-xxxx | |
| cccc | example | Sales | xxx-xxxx-xxxx | xxx-xxxx-xxxx |
環境作成
Microsoft Graph PowerShell SDK がインストールされていない方は以下のコマンドを実行します。
#Microsoft Graph PowerShell SDK をインストールする
Install-Module Microsoft.Graph以下のコマンド実行ポリシーを設定します。
#実行ポリシーを設定する
Set-ExecutionPolicy -ExecutionPolicy RemoteSigned -Scope CurrentUserモジュールのインポートをします。
#Microsoft Graph PowerShellモジュールのインポート
Import-Module Microsoft.Graphユーザー作成
Microsoft Graph APIに接続に接続します。
#接続
Connect-MgGraph -Scopes "Directory.ReadWrite.All"先程作成したCSVファイルを読み込みます。パスは書き換えてください。
#CSV読み込み
$CSVs = Import-Csv -Encoding UTF8 `
-Path "" ユーザー作成のコマンドを実行します。
#ユーザー作成
foreach($CSV in $CSVs)
{
    $PasswordProfile = @{
        forceChangePasswordNextSignIn = $true #trueは初回サインイン時にパスワード変更
        Password = $CSV.Password
    }

    #UPNの@より前をmailNickNameとして取得します。
    $txt = $CSV.UserPrincipalName
    $re = "[a-z0-9!#\$%&'*+/=?^_`{|}~-]+(?:\.[a-z0-9!#\$%&'*+/=?^_`{|}~-]+)*@"
    $mailNickname = [regex]::Match($txt, $re, "IgnoreCase").Value.Replace("@","")

		#必須
    New-MgUser -DisplayName $CSV.DisplayName `
    -UserPrincipalName $CSV.UserPrincipalName `
    -AccountEnabled `
    -MailNickName $mailNickname `
    -PasswordPolicies "DisablePasswordExpiration" `
    -PasswordProfile $PasswordProfile `
    -UsageLocation "JP" `
    -PreferredLanguage "ja-JP"

		#オプション、値が空の場合でも受け取れるように1行ずつ実行する。
    Update-MgUser -UserId $CSV.UserPrincipalName -JobTitle $CSV.JobTitle
    Update-MgUser -UserId $CSV.UserPrincipalName -Surname $CSV.Surname
    Update-MgUser -UserId $CSV.UserPrincipalName -GivenName $CSV.GivenName
    Update-MgUser -UserId $CSV.UserPrincipalName -Department $CSV.Department
    Update-MgUser -UserId $CSV.UserPrincipalName -BusinessPhones $CSV.BusinessPhones
    Update-MgUser -UserId $CSV.UserPrincipalName -MobilePhone $CSV.MobilePhone
}確認
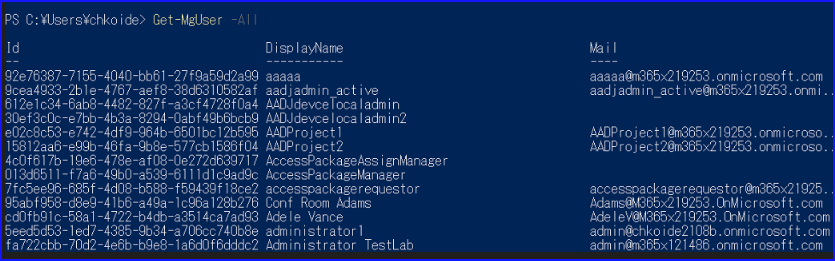
CSVファイルのユーザーが作成されているか確認を取ります。作成できていないユーザーは赤字で「ユーザーは存在しません」みたいなエラーが出ます。
実行結果は変数に格納されているため、値が欲しい場合は変数を呼び出します。
#確認
$MgUsers = foreach($CSV in $CSVs)
{
    Get-MgUser `
    -UserId $CSV.UserPrincipalName `
    | select-Object DisplayName,UserPrincipalName,JobTitle,Surname,GivenName,Department,BusinessPhones,MobilePhone
}作業証跡として確認用のCSVファイルを作成する場合は以下のコマンドを実行します。
エラーが出る場合は「-Encoding utf8BOM」を「-Encoding utf8」に書き換えて実行します。
#確認用のCSVファイル作成
$MgUsers | export-CSV -Path "ファイルへのパス+ファイル名" -Append -Encoding utf8BOM作業終了したのでMicrosoft Graph APIからの接続を切断します。
#切断
Disconnect-Graph参考
New-MgUser (Microsoft.Graph.Users)
Create a new user.\rThe request body contains the user to create. At a minimum, you must specify the required properties for the user. You can optionally specify any other writable properties. Permissions Permission type Permissions (from least to most privileged) Delegated (work or school account) User.ReadWrite.All, Directory.ReadWrite.All, DeviceManagementServiceConfig.ReadWrite.All, DeviceManagementManagedDevices.ReadWrite.All, DeviceManagementConfiguration.ReadWrite.All, DeviceManagementApps.ReadWrite.All, Delegated (personal Microsoft account) Not supported Application User.ReadWrite.All, Directory.ReadWrite.All, DeviceManagementServiceConfig.ReadWrite.All, DeviceManagementManagedDevices.ReadWrite.All, DeviceManagementConfiguration.ReadWrite.All, DeviceManagementApps.ReadWrite.All,
https://learn.microsoft.com/en-us/powershell/module/microsoft.graph.users/new-mguser?view=graph-powershell-1.0

MSOnline / AzureAD PowerShell から Graph PowerShell SDK への移行について 4_ユーザー管理
こんにちは、 Azure Identity サポート チームの小出です。 この記事は、この記事は、MSOnline / AzureAD モジュール廃止について、1. 概要編、2. 移行導入編、3. インストール・接続編 の続きとして連載しています。 4 回目となる今回からは、具体的に、新しい Microsoft Graph PowerShell SDK を使用したユーザーの管理方法につい
https://jpazureid.github.io/blog/azure-active-directory/azuread-module-retirement4/